What Pilot
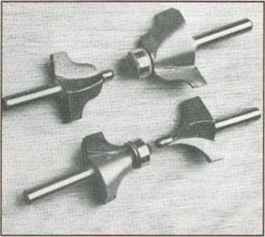
The solid pilot is an integral part of the bit. It's about M* inch in diameter and extends about 'A inch below the cutting edges. This extension rubs directly against the surface of your work to guide the tatter and control its direction. The main disadvantage to the solid pilot is that it requires a gentle, steady hand on the router to get consistent results without marring the surface where the pilot atbs.
The hall-bearing pilot is a bearing mounted on the tip of the bit. This bearing is pressed against the surface of the work and allows the cutter to spin inside it, thus protecting the surface from being marred. But the system is not foolproof. The bearings can ¡5« dirt)1 or gummed up and seize, which makes them spin with the cutter and mar the surface. It Is very imponant to keep these bearings clean and lubricated with a light oil (such as WD-40).
Another quirk to remember with ball-bearing pilots is that you must apply enough pressure against the work to stop the outside race of the bearing from turning. If you don't keep fairly firm contact with the work, the bearing »ill spin with the cuttcr and sometimes cause more marring than a solid ptbt! This is because the bearing is four or five times the diameter of the solid pilot: its surface travels a lot faster and will bum your work sooner.
Softwoods such as cedar and redwood can be compressed by pressing

Though (hey appear to be slightly different sizes, the Roman ogee bits produce identical cuts, as do the two round-overs. The difference is the size of the pilot. A small-diameter pilot allows the bulk of the bit to he reduced. The smaller pilot also allows the bit to cut deeper into an inside too heavily. If you find this happening, try steaming the tracks a bit before you finish sand. You can use a portable clothing steamer, or simply drape a damp clorh over the compressed wood and hold a hot iron against it for a couple of seconds. The steam should soften the fibers and allow them to relax to nearly their original configuration.
Bearing interchangeability is a factor to consider when choosing cutters. There are several different configurations for mounting pilot bearings to cutters. Try to standardize your collection as much as possible so you can trade bearings from one cuttcr to another. This is handy if a bearing freezes up; you can grab one from another bit.
Though (hey appear to be slightly different sizes, the Roman ogee bits produce identical cuts, as do the two round-overs. The difference is the size of the pilot. A small-diameter pilot allows the bulk of the bit to he reduced. The smaller pilot also allows the bit to cut deeper into an inside conter.
But bearing interchangeability also makes your bits more versatile. By changing to a bearing with a different outside diameter, you change the relationship of the bit to the stock and, essentially, change the profile it cuts. You can go so far as to keep a variety of extra bearing; on hand for that reason.

EDGE ROUTING TECHNIQUES
Routing the edge of a board is pretty straightforward stuff. In most cases, you'll use a piloted bit. The pilot will control the cut width, and it will keep the router from drifting too far into the board. But this doesn't mean you can't go wrong.
Your success will be enhanced by your grasp of the fundamentals. And knowing some tricks can help you deal with unusual situations and problems.
Once you know what profile you want, you have to choose the router setup to use. The rule of thumb on this, articulated throughout this book, is that if you can manipulate the work comfortably on a table, use the router table. But if the work is too large or too heavy or too awkward, clamp it down and move the router over it.
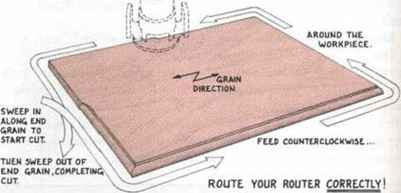
Which way do we go? Direction of feed is critical when performing edge treatments. The key here is to be as ornery as possible. Always feed against the cutter's force. If the bit wants to drive the router in one direction, you push or pull it in the other.
This rule works both for handheld routers and for routers mounted upside down under a router table. If in doubt, hold the router near the work and jog the switch. As the router slows to a stop, note which way the cutter was turning. Think of the cutter as a tire, and decide which way it would roll if you left it to its own devices. Then feed the opposite way.
The consequences of feeding the wrong way arc usually not too dire, because the router will have a tendency- to kick away from the stock without causing extensive damage.
But even if you hold die router against the stock, you'll notice its tendency to gallop ahead and pull you along. This process, known as a climb cut, will produce a rough, inconsistent cut. Persistent climb cuts may eventually bend or break the cutter, and they can even damage the router bearings.
Where do we start? The important point is where you don't want to end. If you rout all around a piece of wood, you'll noticc that you almost always get a little bit of splintering as you exit from an end-grain cut. If you then rout the splintered side, the damage is almost ahvays removed.
The trick, then, is to avoid finishing with an end-grain exit. Stan

in the middle of the end grain, then finish there. That way, you'll avoid splinters where they can spoil the finished cut.
How do we start? As always, very carefully. Actually, the best way-is to sweep into the edge as opposed to starting at a comer.
If you start at a comer, there's a strong tendency for the cutter to slip around the comer and pull you and the router down the wrong side of the work, going the wrong way. with all of the attendant adverse effects. Sweeping in allows you to case into the cut, while developing momentum in the correct direction. It also avoids the tendency to burn where you stop or start. You can
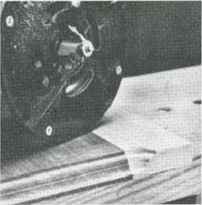
Tear-out and splintering is most likely to occur when exiting an end-grain cut, regardless offeed direction. One solution is to rout the end grain first, on the likelihood that the long-grain cuts will remove any evidence of the tear-out. But you can't count on that solution if you aren't routing completely around the workpiece. In that case, clamp a scrap against the long-grained edge, as shown here.
Continue reading here: Problem Solver
Was this article helpful?
Responses
-
yerusalem isaias1 year ago
- Reply
-
Yohannes1 year ago
- Reply
-
Doda2 years ago
- Reply
-
veikko lehtonen2 years ago
- Reply
-
Danielle3 years ago
- Reply
-
ROBERT3 years ago
- Reply