2026-04-04
infeed table i am making
"C:\RB\misc\rbwebsite\woodworking\tablesaw\jigs\infeed table\woodsmith table saw infeed table.jpg"
miter slot extension
"C:\RB\misc\rbwebsite\woodworking\tablesaw\miter gauge infeed extension.jpg"
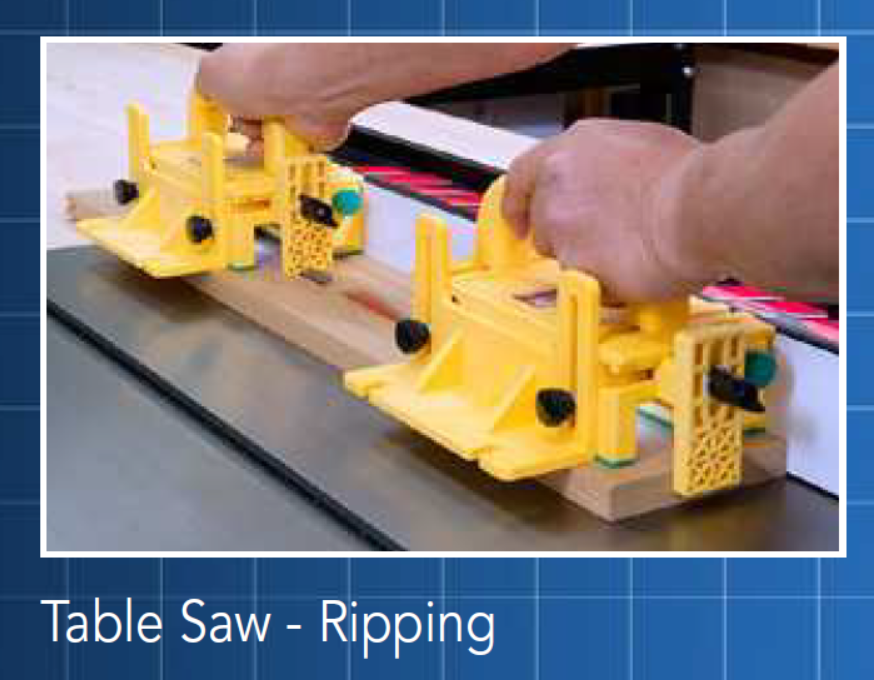
jigs - Micro-Jig GRR-Ripper
jigs - misc
jigs - Planing Jigs
jigs - Turning Jigs
jigs - #zeroplay jigs pdfs in directory
2026-04 FWW Mike Pekovich's Go-To Work Holding Jigs for planing and sawing video - all very simple, should probably make all of them
2026-01 jig for finger grips on cutting boards
2025-03 fww 0258 6 essential bench jigs
2025-02 This Lost Art Press article on using a notched batten (aka "Dürer Stick") to allow planing across a surface without an end vise and another
I checked for the follow up article mentioned and didn't find it - Would be around blog post page 443
Richard Maguire posted an excellent video called “The Holdfast and the Batten” which is tied to this video
called a “reglet” in France and England
fine homebuilding on modern look window trim with reglet (different use of word)
Installing Threaded Inserts into Plywood | Woodsmith
Buffing Station in a Box | Popular Woodworking
keeps compound from making a mess on the wall
Family Handyman 13 Dirt-Simple Woodworking Jigs You Need
7 Shop Jigs for Better Woodworking | Family Handyman
facebook video Router flattening jig with parf-like table using dovetail clamps
Jointing technique similar to shooting board for preparing stock for edge jointing
Fine Woodworkingvideo series: cool jig for picture frames and .pdf local
home made power feeder using cordless drill
AMWW Dec 2010 p10 add blocks to jaws of clamp on tool guide [2025-01-23 no idea what this means; this is the wrong location; not pww nor fwweither]
woodsmith 234 pdfp 8 door setting jig that would be good for french cleats too
ShopNotes pdfp7 p7 glue a dowel onto block and mount light to it, then put it in dog holes
Shop-made Pinch Rods at Popular Woodworking
Thin workpiece Planing Board video
13 Dirt-Simple Woodworking Jigs You Need | Family Handyman
circular saw edge guide
circular saw base with replaceable insert PWW Feb 2006 pdpf9 p20
drawer holder for planing after assembly (e.g. box joint or dovetails) AMWW Nov 2012 pdfp10
Family Handyman's 13 simple jigs
home made crank & chain mechanism to make adjustable height bench Am Woodworker "September, 2008.pdf" p12
home made scaffold pick / plank torsion box Shopnotes 93 pdfp21
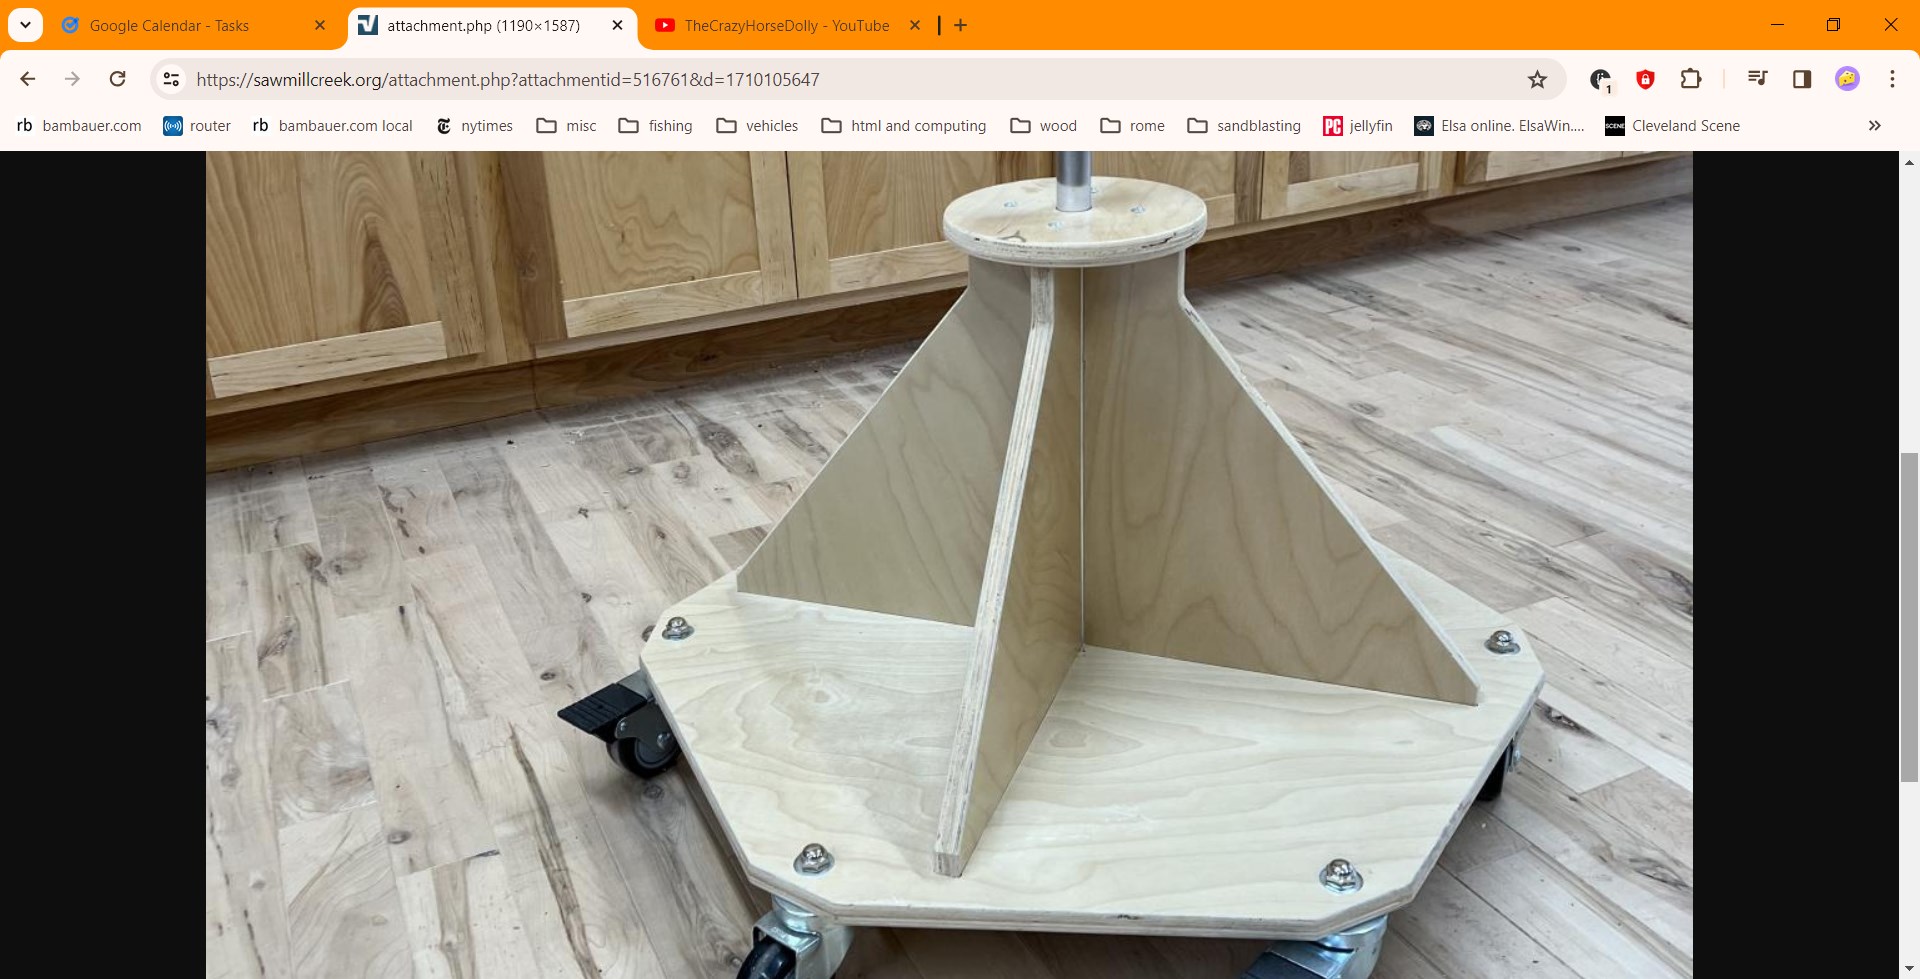
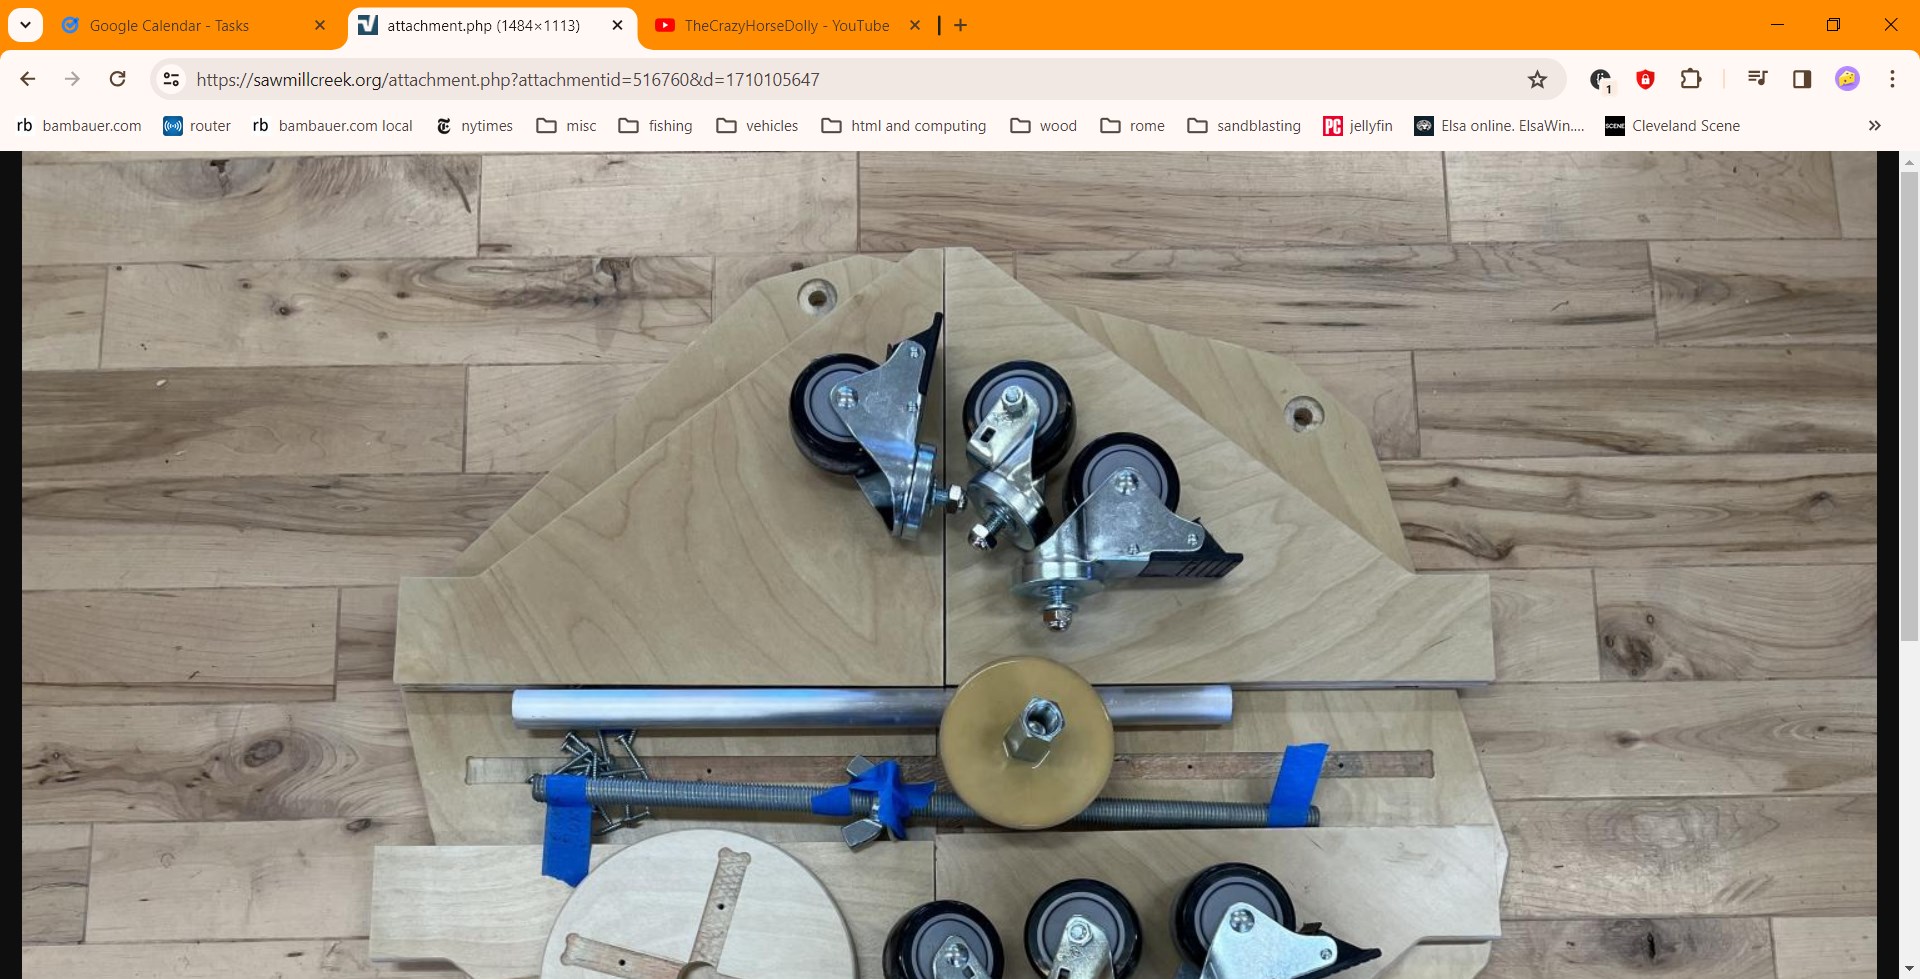
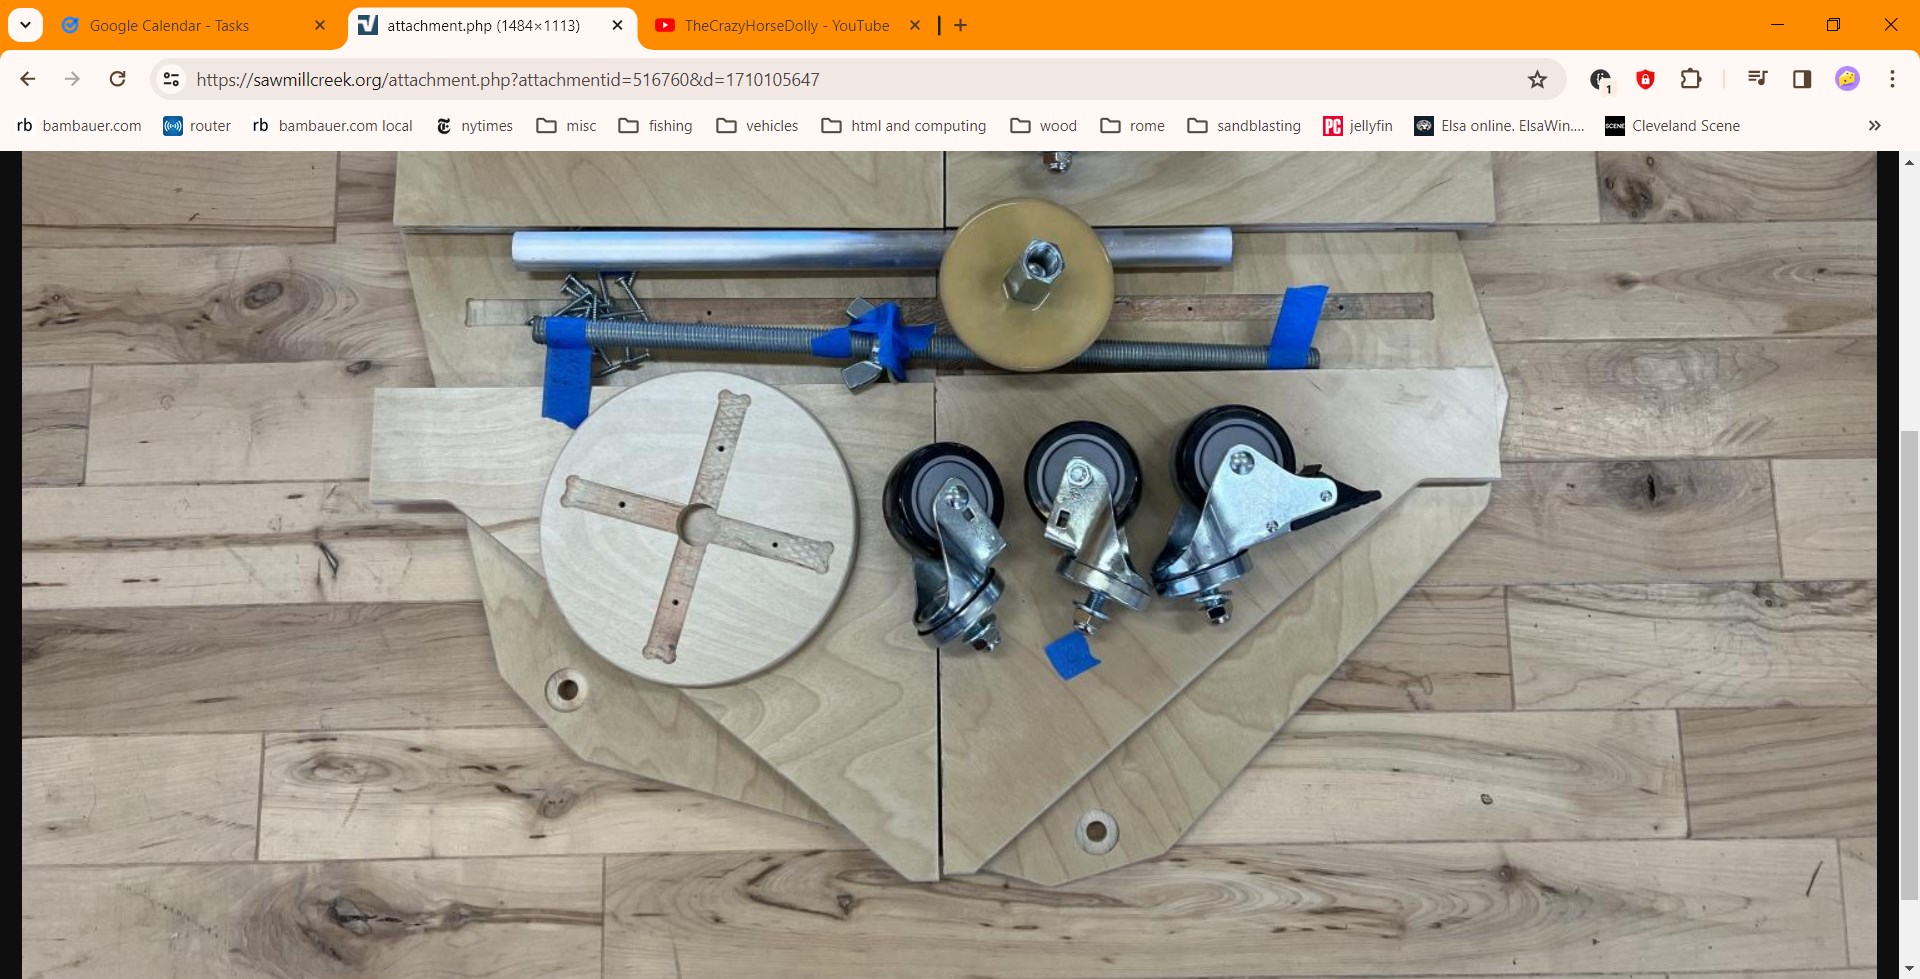
crazy horse dolly for moving plywood around shop then supporting it at tablesaw 1 2 3 4 thread video
jig to make blood groove (aka "juice groove") in cutting board using 4 corner clamps similar to the ones I have
video of similar
tablesaw finger saver with handscrew
Precision Planing Jig for miter splines but useful elsewhere too (local .pdf)
kerf jigs for lining up circ & jig saw Aug 2010 PWW p14
chamfers gauge shopnotes 31 p30
"Dado Jig is a Cut Above" FWW 0226 pdfp64 adjustable width with clamps on bottom so not in router's way
featherboard clamp that fits in miter gauge slot allows changing of angle FWW 0223 p15
square assembly jig 120 pdfp7
dado jig 2 piece that has slanted edge to allow easy width adjustment by sliding FWW 0219 PDFP15
Working Small - jigs to handle small parts PWW 2004-12 p86
Danish guy in video with technique probably similar accuracy to parf without expense thread where I found it
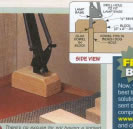
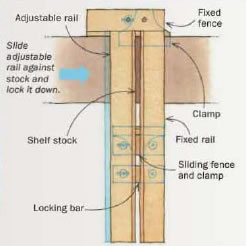
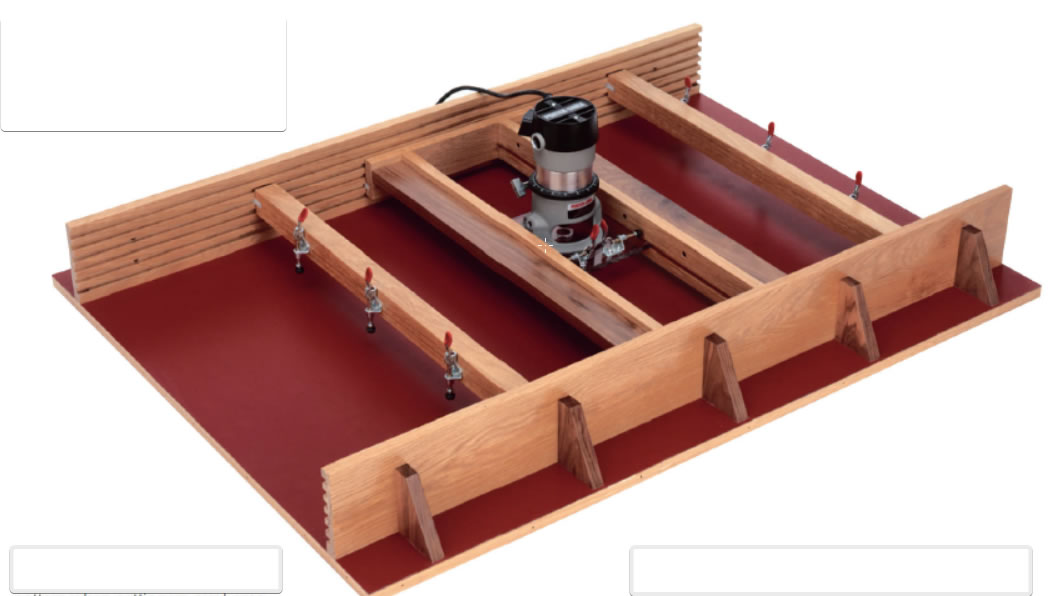
board and small slab flattening jig for router with groves on sides and crossmembers with toggle clamps
"Jigs & Fixtures for the Table Saw & Router best of woodworker's journal wwj.pdf" pdfp76
routing with a jointer "Jigs & Fixtures for the Table Saw & Router best of woodworker's journal wwj.pdf" pdfp70
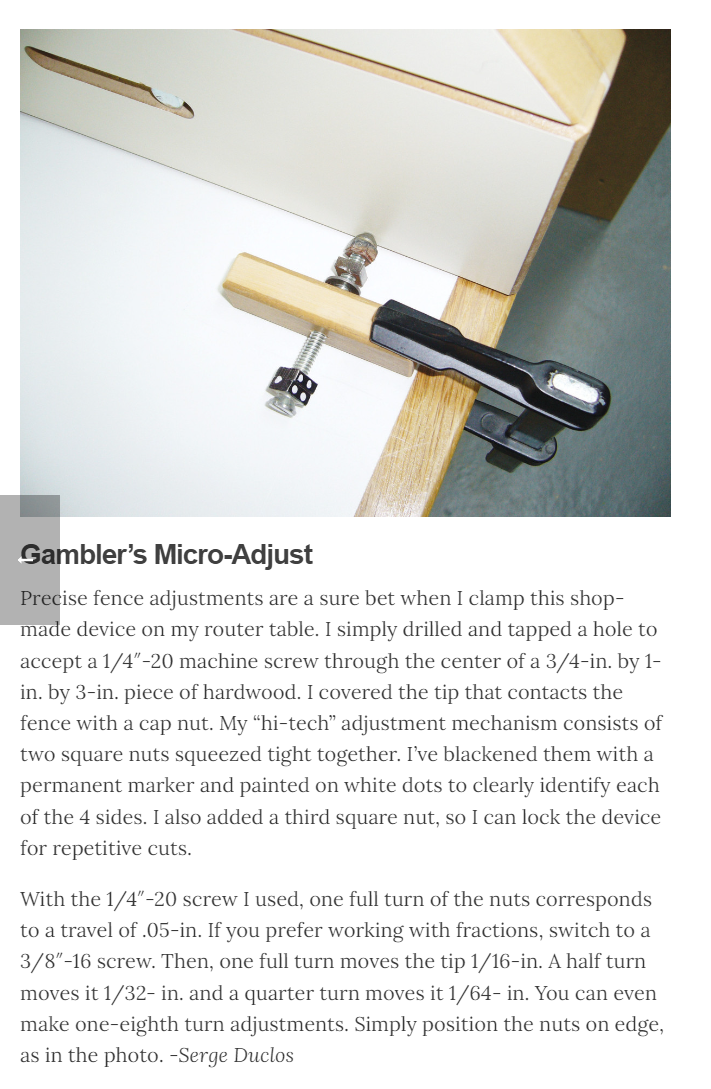
micro-adjust using square nuts to make it easier to count turns (local .png)
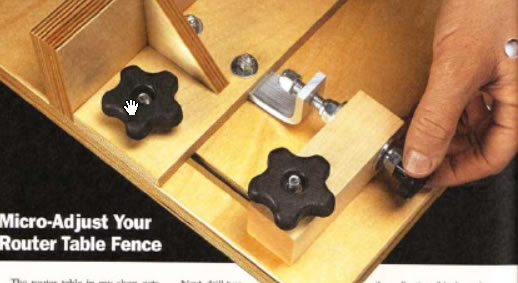
simple micro adjust for table saw fence August_2009_PW pdfp10
micro adjuster for router table fence using eyebolt to contact fence fww 0241 pdfp 16
router table micro adjuster Shopnotes 138 p 4
has stop bolt to return to prior setting
micro-adjust for router table fence Shopnotes 88 p6
see also tablesaw.html#micro_jip_ripper
| sizes | orientation | images |
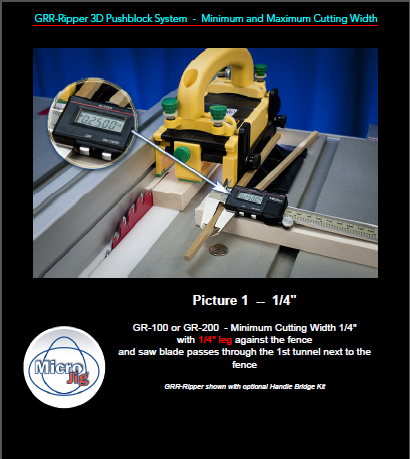
| 1/8" < x < 2 7/8" | 1/8" side leg (green) against fence | replace 1 leg to install replace 1 leg to install color instructions .pdf min_max image 6 color pic with balance support |
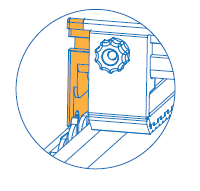
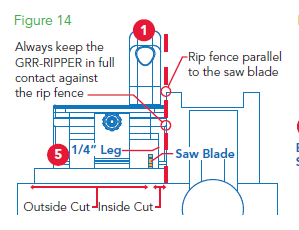
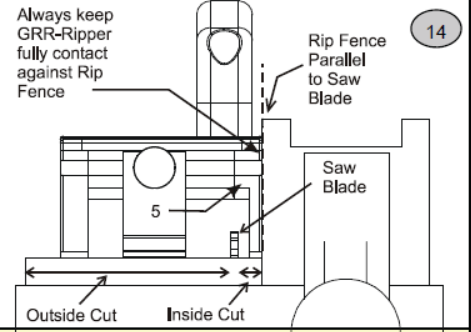
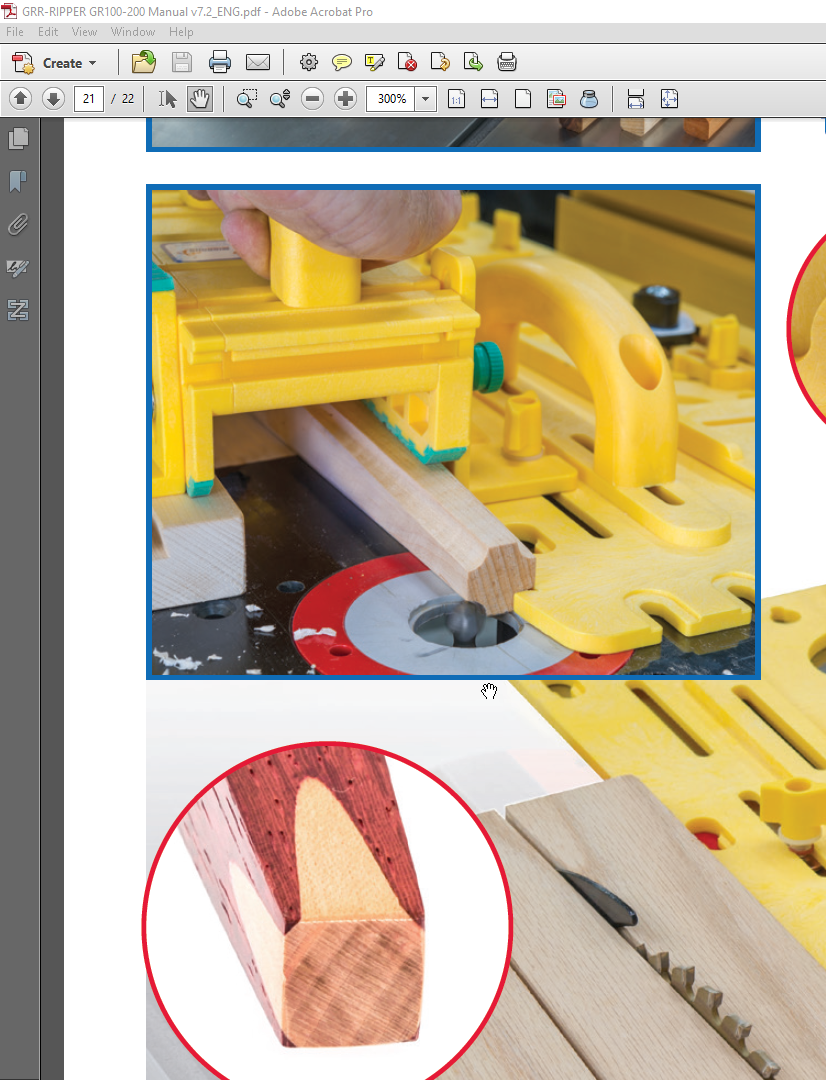
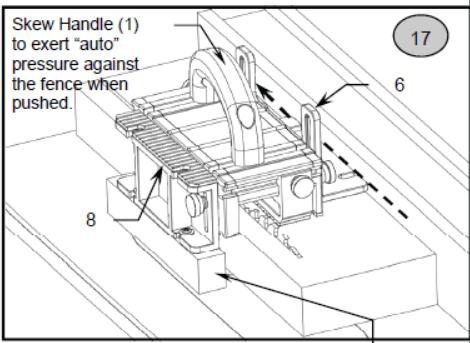
| 1/4" < x < 5/8" | 1/4" leg against fence, blade on fence side of center leg [b&w drawing "always keep gripper against fence" - just for this operation?] |
|
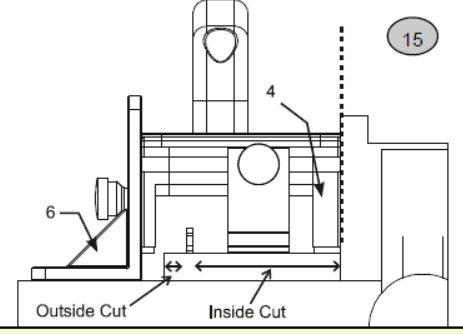
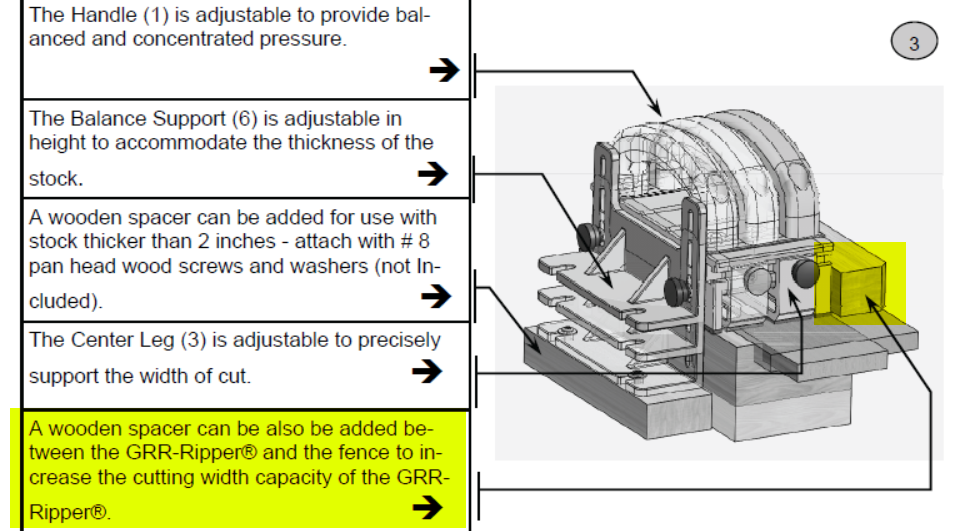
| 5/8" < x < 3 1/4" | 1/2" leg against fence; blade on right side of center leg | outside offcut not supported min_max image 2 color pic |
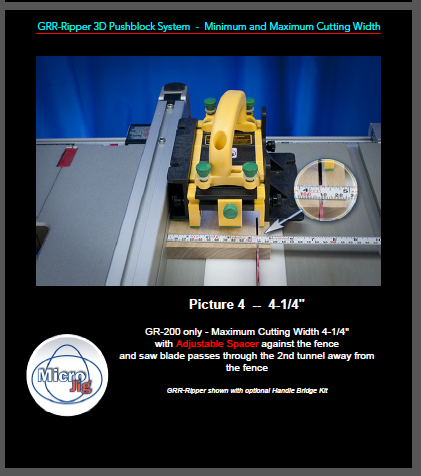
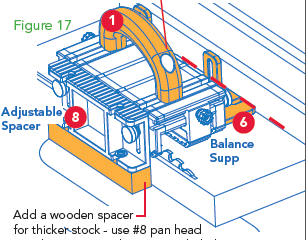
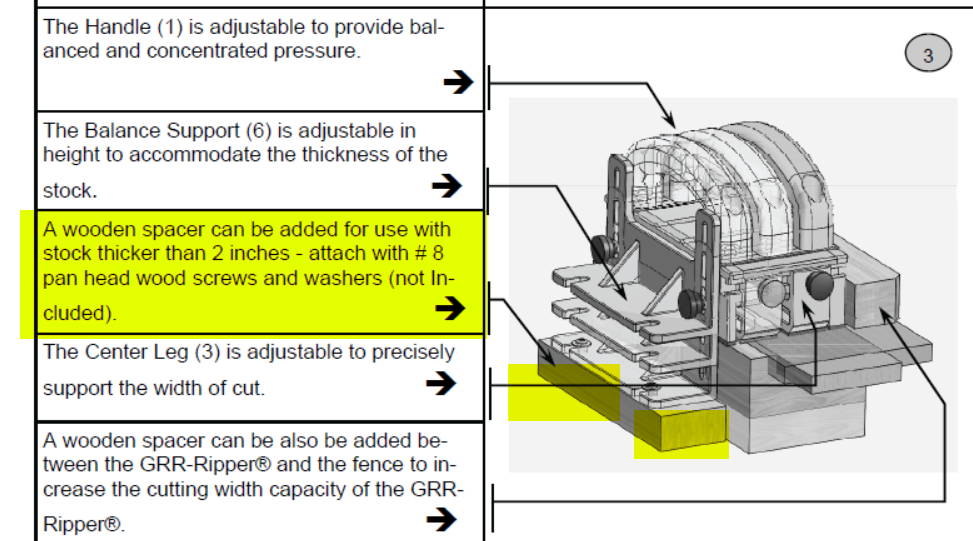
| < 4 1/4" | Adjustable Spacer attached to 1/2" leg against fence | min_max image 4 |
| < 5 1/4" | Balance Support attached to 1/2" leg against fence | min_max image 3 color pic balance support to 1/2" against fence |
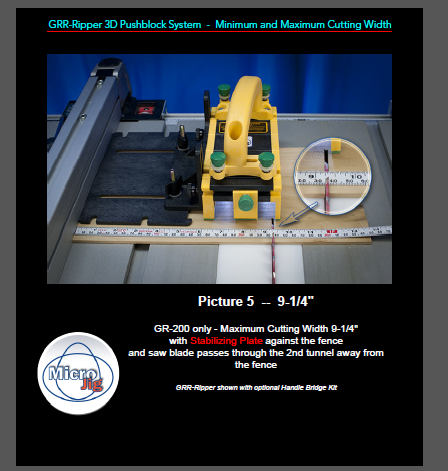
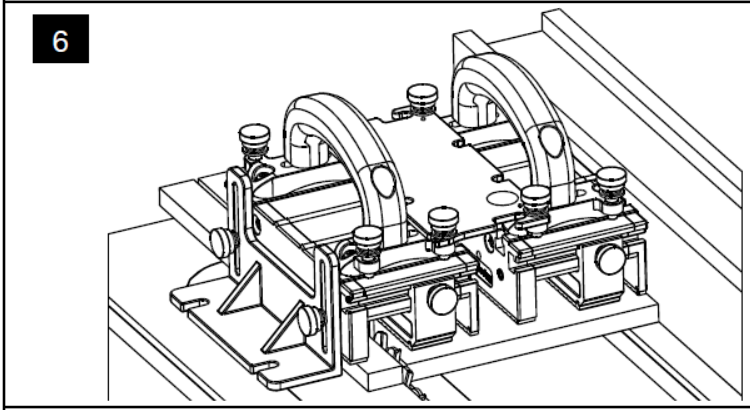
| < 9 1/4" | Stabilizing plate under Balance Support attached to 1/4" leg against fence | min_max image 5 |
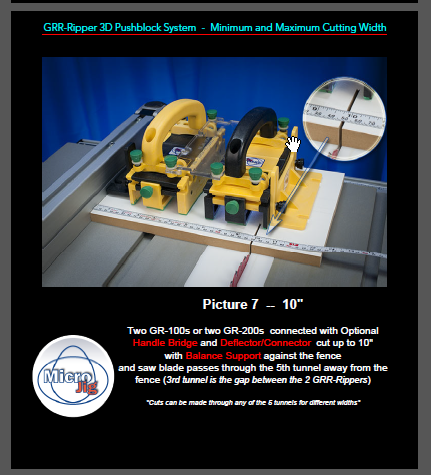
| < 10" | Adjustable Spacer attached to 1/4" leg against fence Handle Bridge and Deflector/Connector 1/4" leg on outside attached to Balance Support |
min_max image 7 |
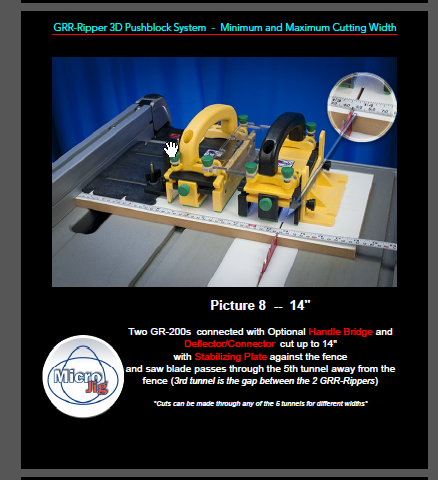
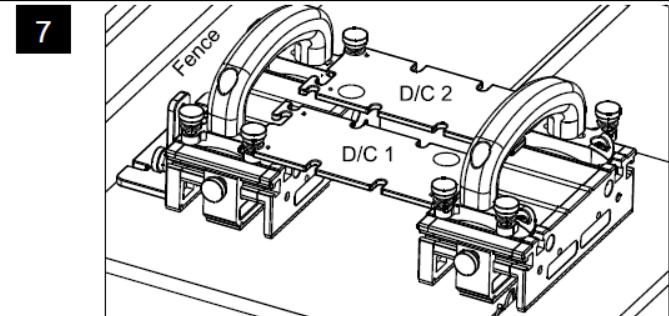
| < 14" | Stabilizing plate under Adjustable Spacer attached to 1/4" leg against fence Handle Bridge and Deflector/Connector 1/4" leg on outside attached to Balance Support |
min_max image 8 |
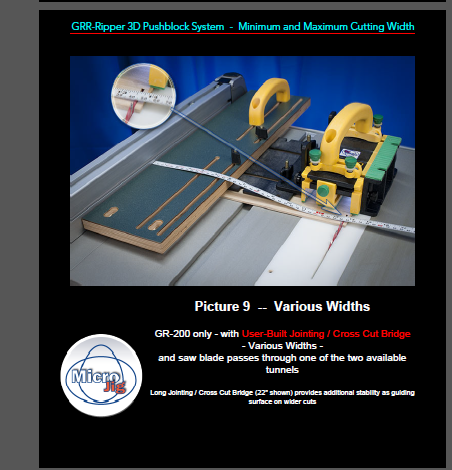
| as wide as necessary |
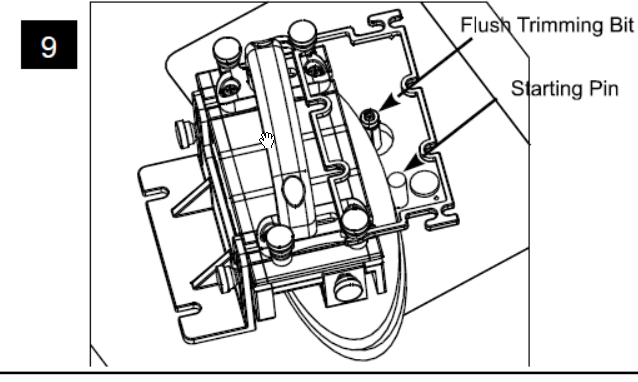
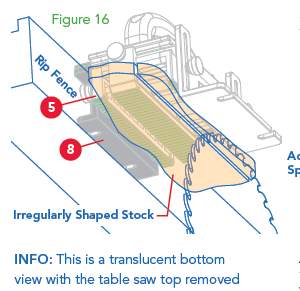
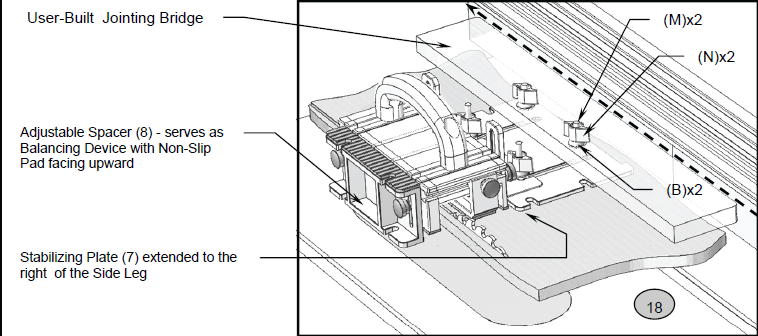
User-Built Jointing/Cross Cut Bridge over Stabilizing plate under Adjustable Spacer attached to 1/4" leg against fence (see pdfp 9 of "MinMaxCutWidth.pdf") (see pdfp 11 of "early version shows jointing bridge GRmanualv4-2sp.pdf") |
min_max image 9 |
| < 16" long | 1 GRR-Ripper | |
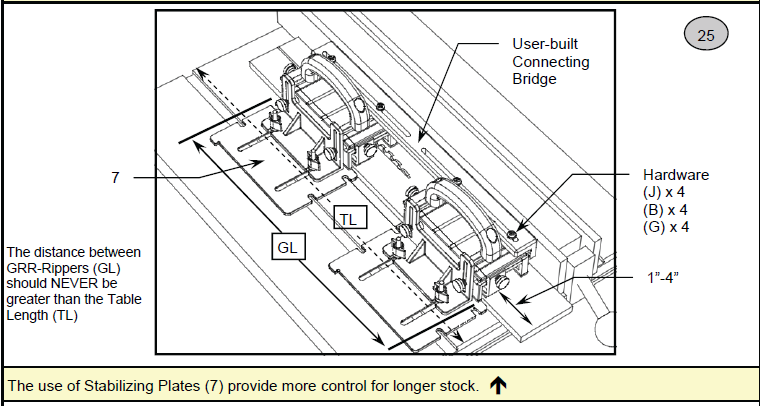
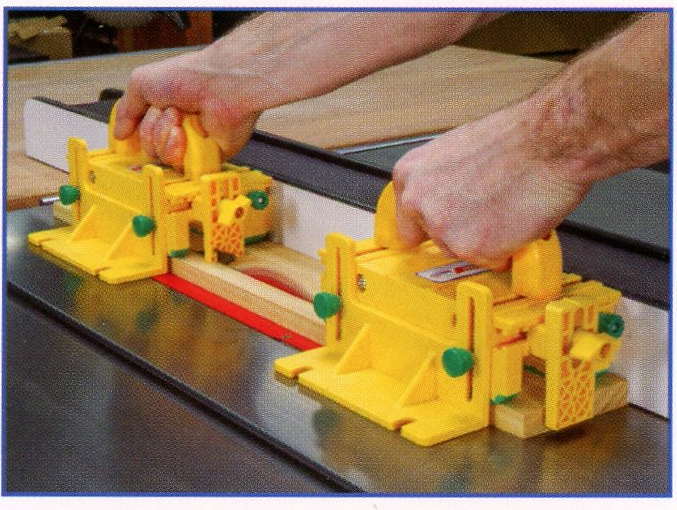
| 16" < x < table saw length + overhang using "user built connecting bridge" |
use 2 grippers, dist from front of first to back of second must be < table saw table length [my grizzly is 27" table depth] (see pdfp 13 of "early version shows jointing bridge GRmanualv4-2sp.pdf") |
b&w drawing overview b&w drawing w/ dimensions |
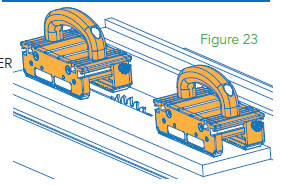
| 16" < x | leapfrog one over the other | color drawing color pic from gravity heel package |
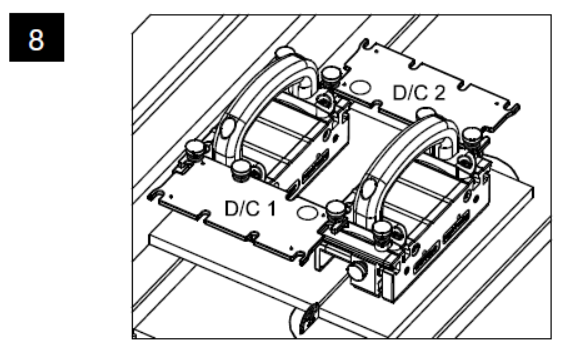
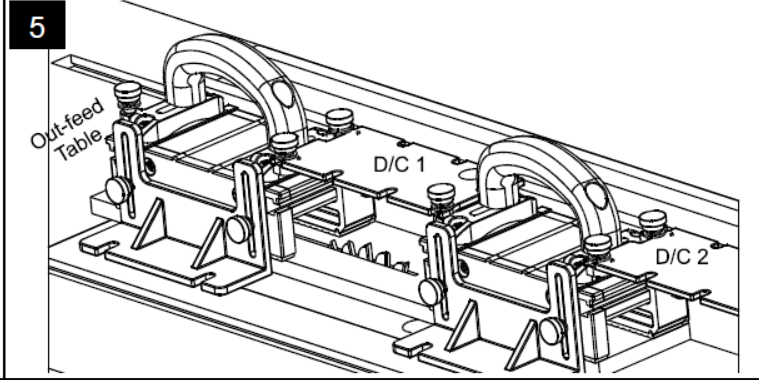
| deflector connector | side by side for up to 13" wide workpiece uses 2 d/c alternate side by side for wide workpiece uses 2 d/c 2 units end to end uses 1 d/c 2 units side by side uses 1 d/c pattern routing guard |
|
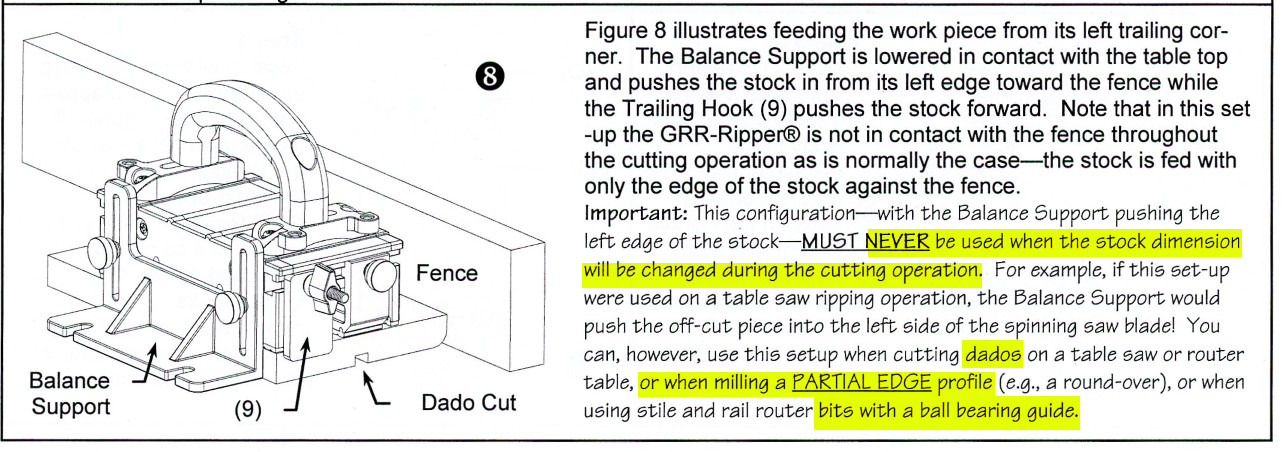
| miters | in the manual, they show a dangerous cut: right tilt saw doing a bevel with the fence to the right of the blade; ok to do similar if left tilt like I have | |
| dados and non-through cuts | don't need to have unit edge against fence [from handle instructions] dados, PARTIAL edge profile (e.g. roundover), bits with bearing guide |
b&w drawing |
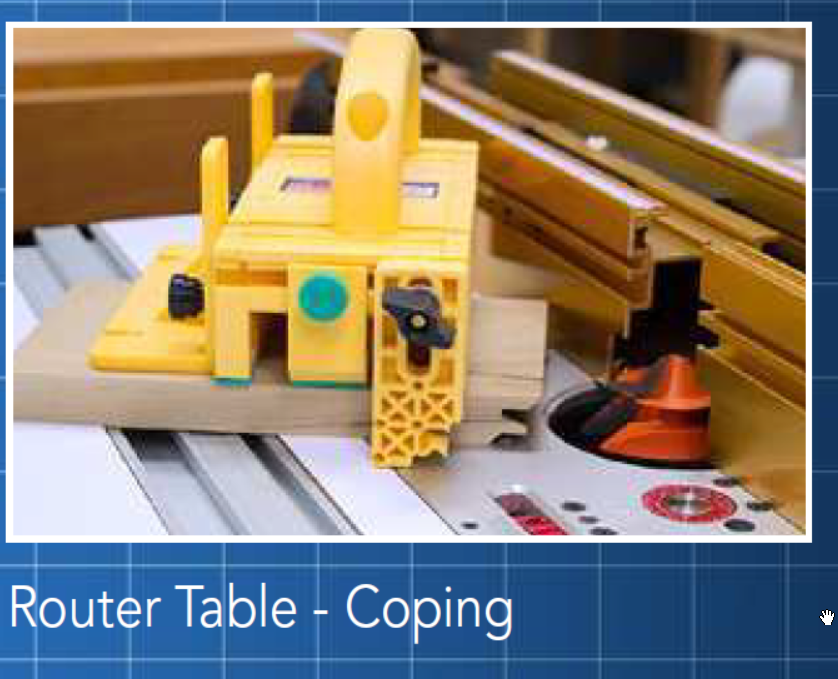
| coping sled | color pic color pic from gravity heel package |
|
| gravity heel | [longer ones are for router, shorter for table saw] | color pic color pic I apparently mislabelled gravity heel color drawing doesn't need to touch table top from grav heel package |
| trailing hook | similar to gravity heel but stationary | color drawing longer user made for reduced splintering [handle instrux] |
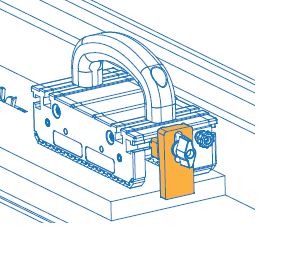
| edge routing full profile | color pic - using balance support no flat plate color pic - using balance support w/ flat plate seems better |
|
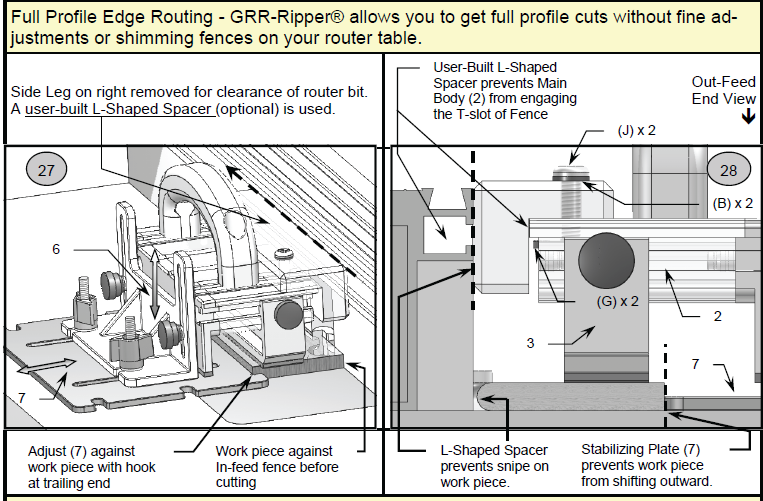
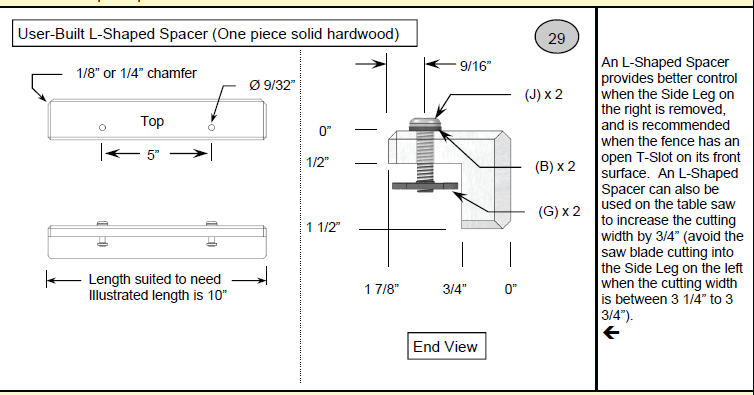
| edge routing full profile L spacer | allows you to get full profile cuts without fine adjustments or shimming fences | color drawing overview color drawing showing dimensions |
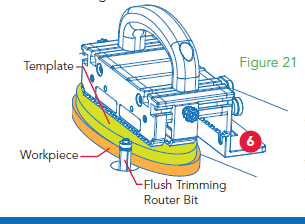
| pattern routing | color drawing | |
| pattern routing for zero clearance insert | from dvd | color pic |
| slotting | color drawing | |
| slotting / edge routing | example is for decorative chair leg bottom | color pic |
| resawing on table saw | color pic color drawing |
|
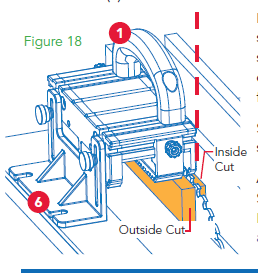
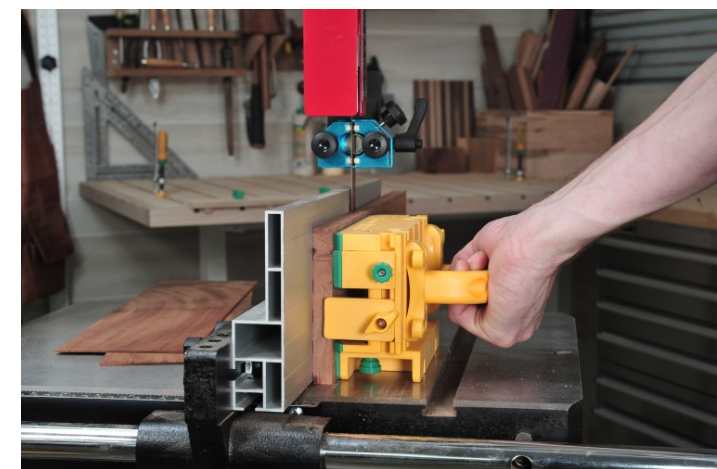
| resawing on band saw | on side with adjustable spacer on bottom (source) | color pic color pic with grav heel but no adj spacer |
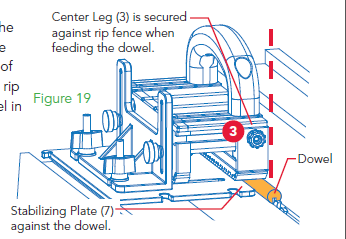
| dowel slotting | color drawing | |
| jointing | color drawing color pic with gravity heel |
|
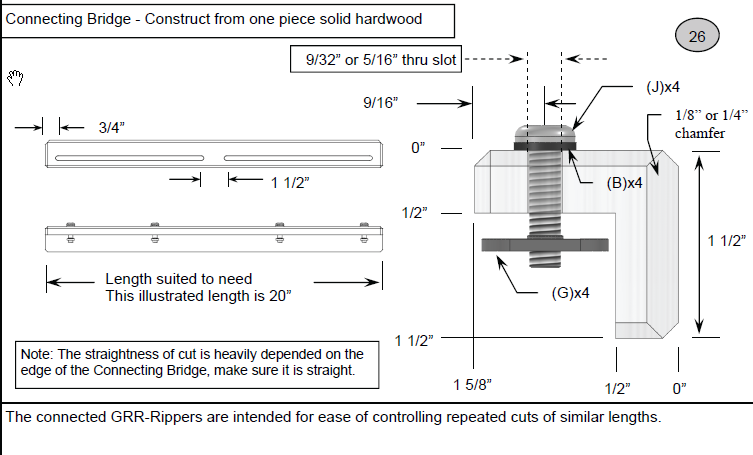
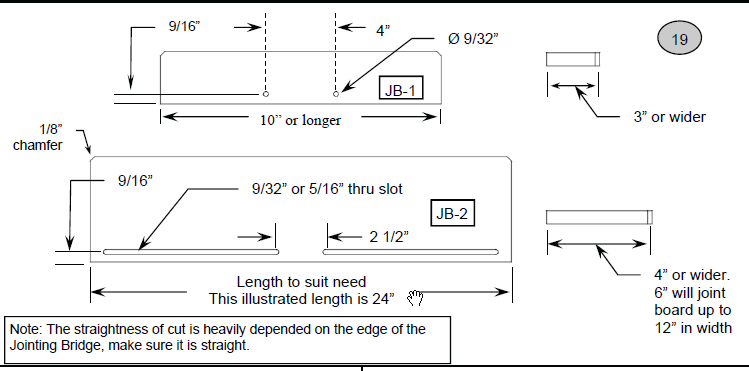
| jointing bridge | to make; allows cutting a straight edge on wider workpiece |
color drawing overview color drawing showing dimensions |
| balance support | apparently ok to not capure offcut if using balance support to keep level | color drawing b&w drawing |
| to make | > max thickness of workpiece - slotted below adj spacers inline connected |
color pic |
min_max cut width.pdf
manual v7.2
manual v4.2
handle bridge kit p1 p2
gravity heel kit p1 p2 p3
deflector connector p1 p2
notes from 2024-04-22
| handle bridge kit | pdfp 2 | longer trailing hook so no tearout |
| early version | pdfp13 | connecting bridge between 2 grippers |
| pdfp14 | L shaped spacer for router | |
| pdfp 10 | spacer for thicker stock | |
| pdfp 11 | jointing | |
| min max cut widths | ||
| [fill in info here] | ||
search for "ripper" to find Micro-Jig GRR-Ripper pushblock files #gripper
\woodworking\000 techniques and specific tools\tablesaw\GRR-Ripper 3D pushblock #gripper push block

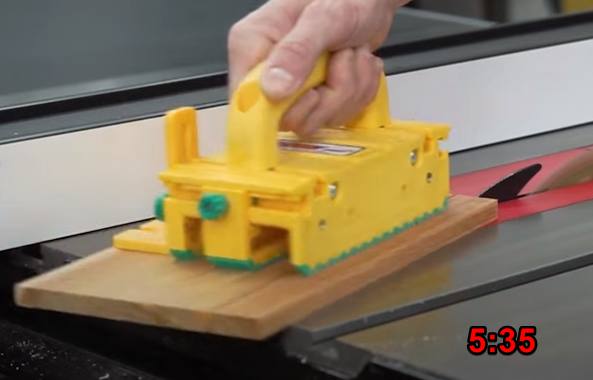
youtube version of full instructional video
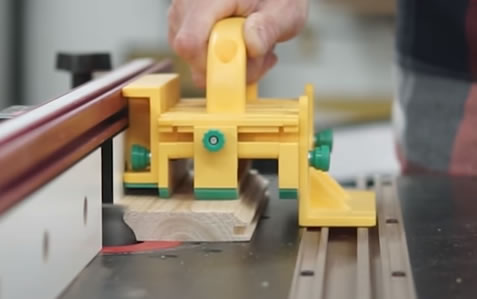
10:40 if you remove the balance support completely, you can put the 1/2" leg against the fence and use the 1/4" leg to control the
offcut side and this will give a rip capacity
of approximately 3"

11:16 for ripping 3" - to 5" put the balance support on the 1/2" leg against the fence

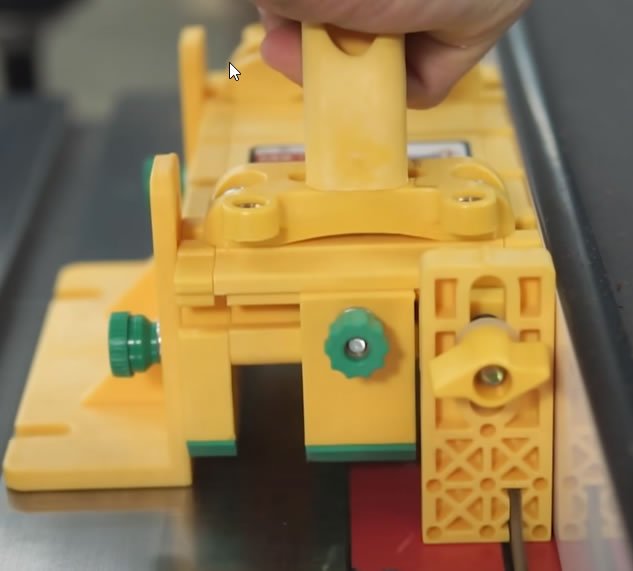
11:37 accessories
12:00 1/8" leg
13:18 typical installation is on outside of existing leg (but can also install by replacing one of the legs)

14:28 handle bridge kit
16:14 deflector connector
17:09 gravity heel kit
made to be cut
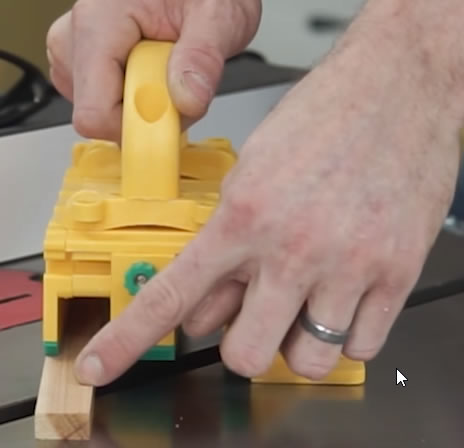
19:14 when cutting a piece where the offcut side isn't very big
and there isn't enough material there for the green grip on the center leg to grab it gravity heel can be used to support it all the way through the cut
32:01 using it as a coping sled by mounting board to bottom

33:28 if using only a portion of bit and top of bit is higher than the top of the workpiece
34:45 routing a groove into edge of piece that is taller than it is wide using the stabilizer plate

2014 March amww pdfp13 scrap wood 3rd hand for supporting workpiece
pww 255 nov 2020 pdfp14 sanding jig to get accurate circle
Gluing and Assembly Jigs and Helpers
Making and Using Squaring Sticks FWW 0301 p40
Gluing and Assembly Jigs and Helpers
steam bending using pvc pipe and a rice steamer FWW 0221 pdfp16
specs on pegboard hooks I bought to make shelves & custom hangers list the Hillman H851860 as 0.225" in diameter
which is 9/40"

29/128 = 0.2265
Router Forum's "Router Thingamajig" home built version of the the router lathe / router crafter. (thread has 357 posts)
perfectly locating t-nuts fww 275 p16
drill hole all the way through workpiece into board below, then place dowel in hole in board, remount workpiece and drill counterbore
relatively small panel saw like jig for crosscutting plywood Shopnote 90 p6

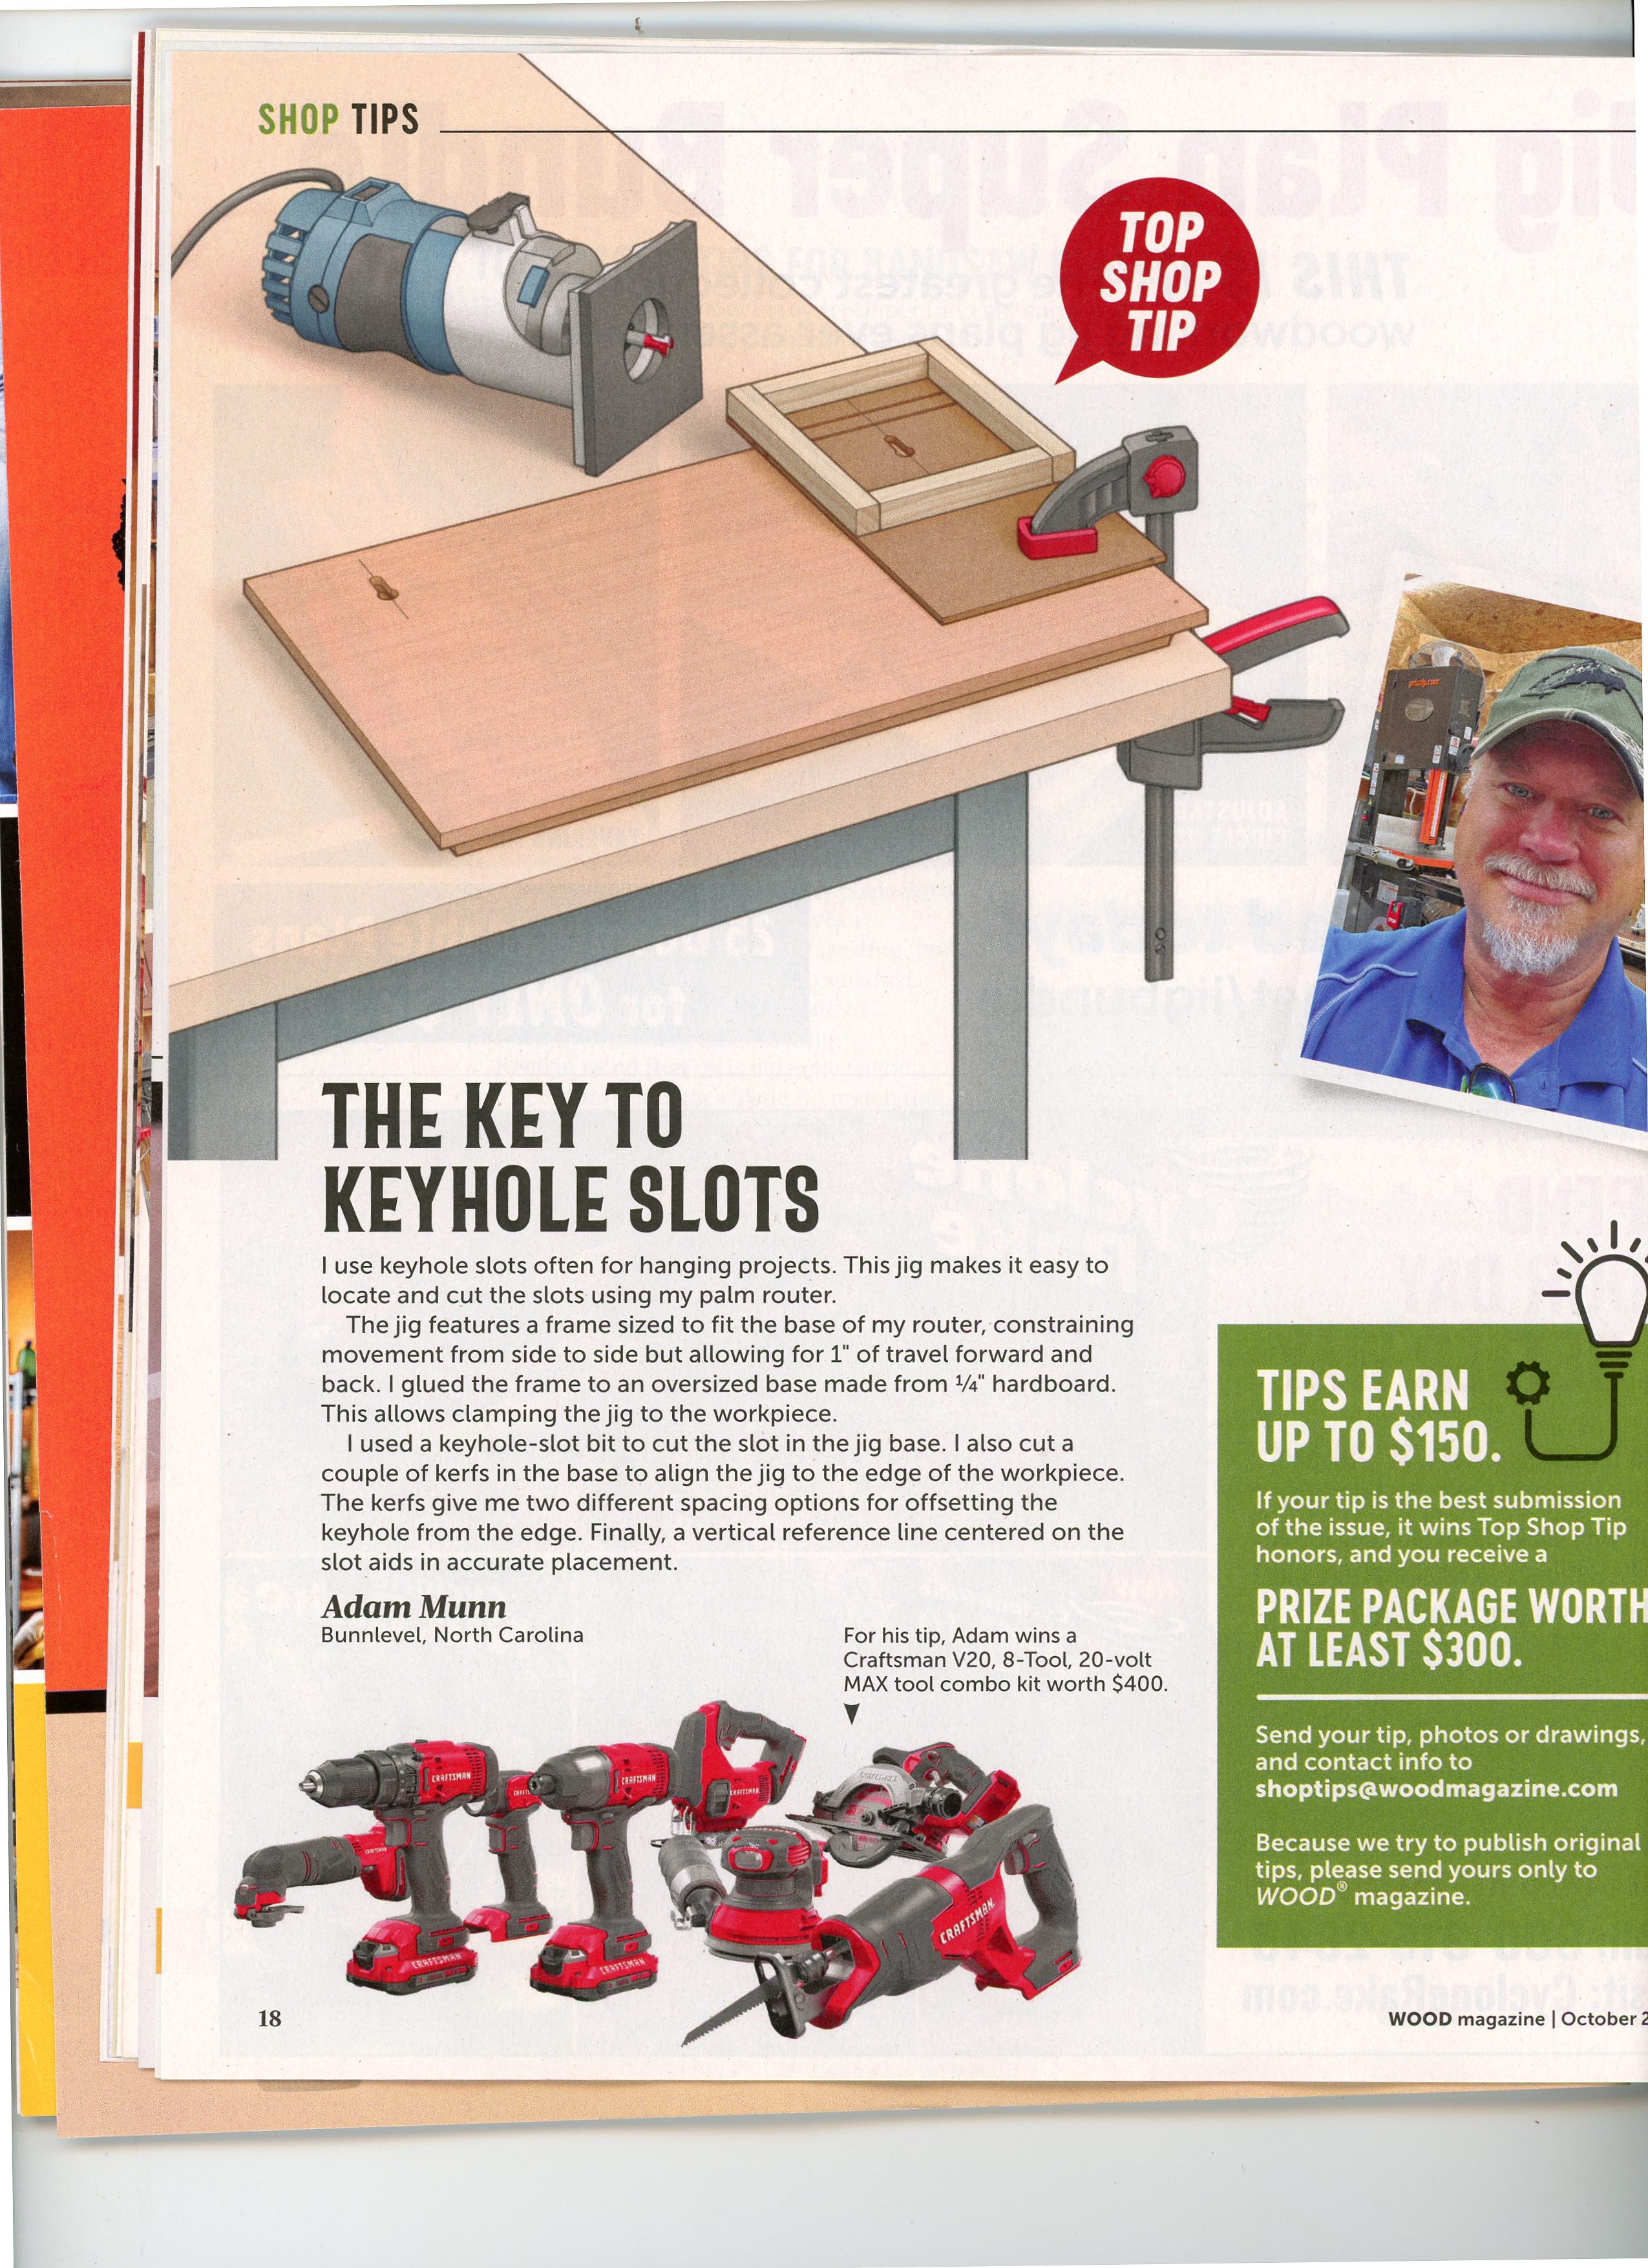
keyhole jig Wood mag Oct 2023
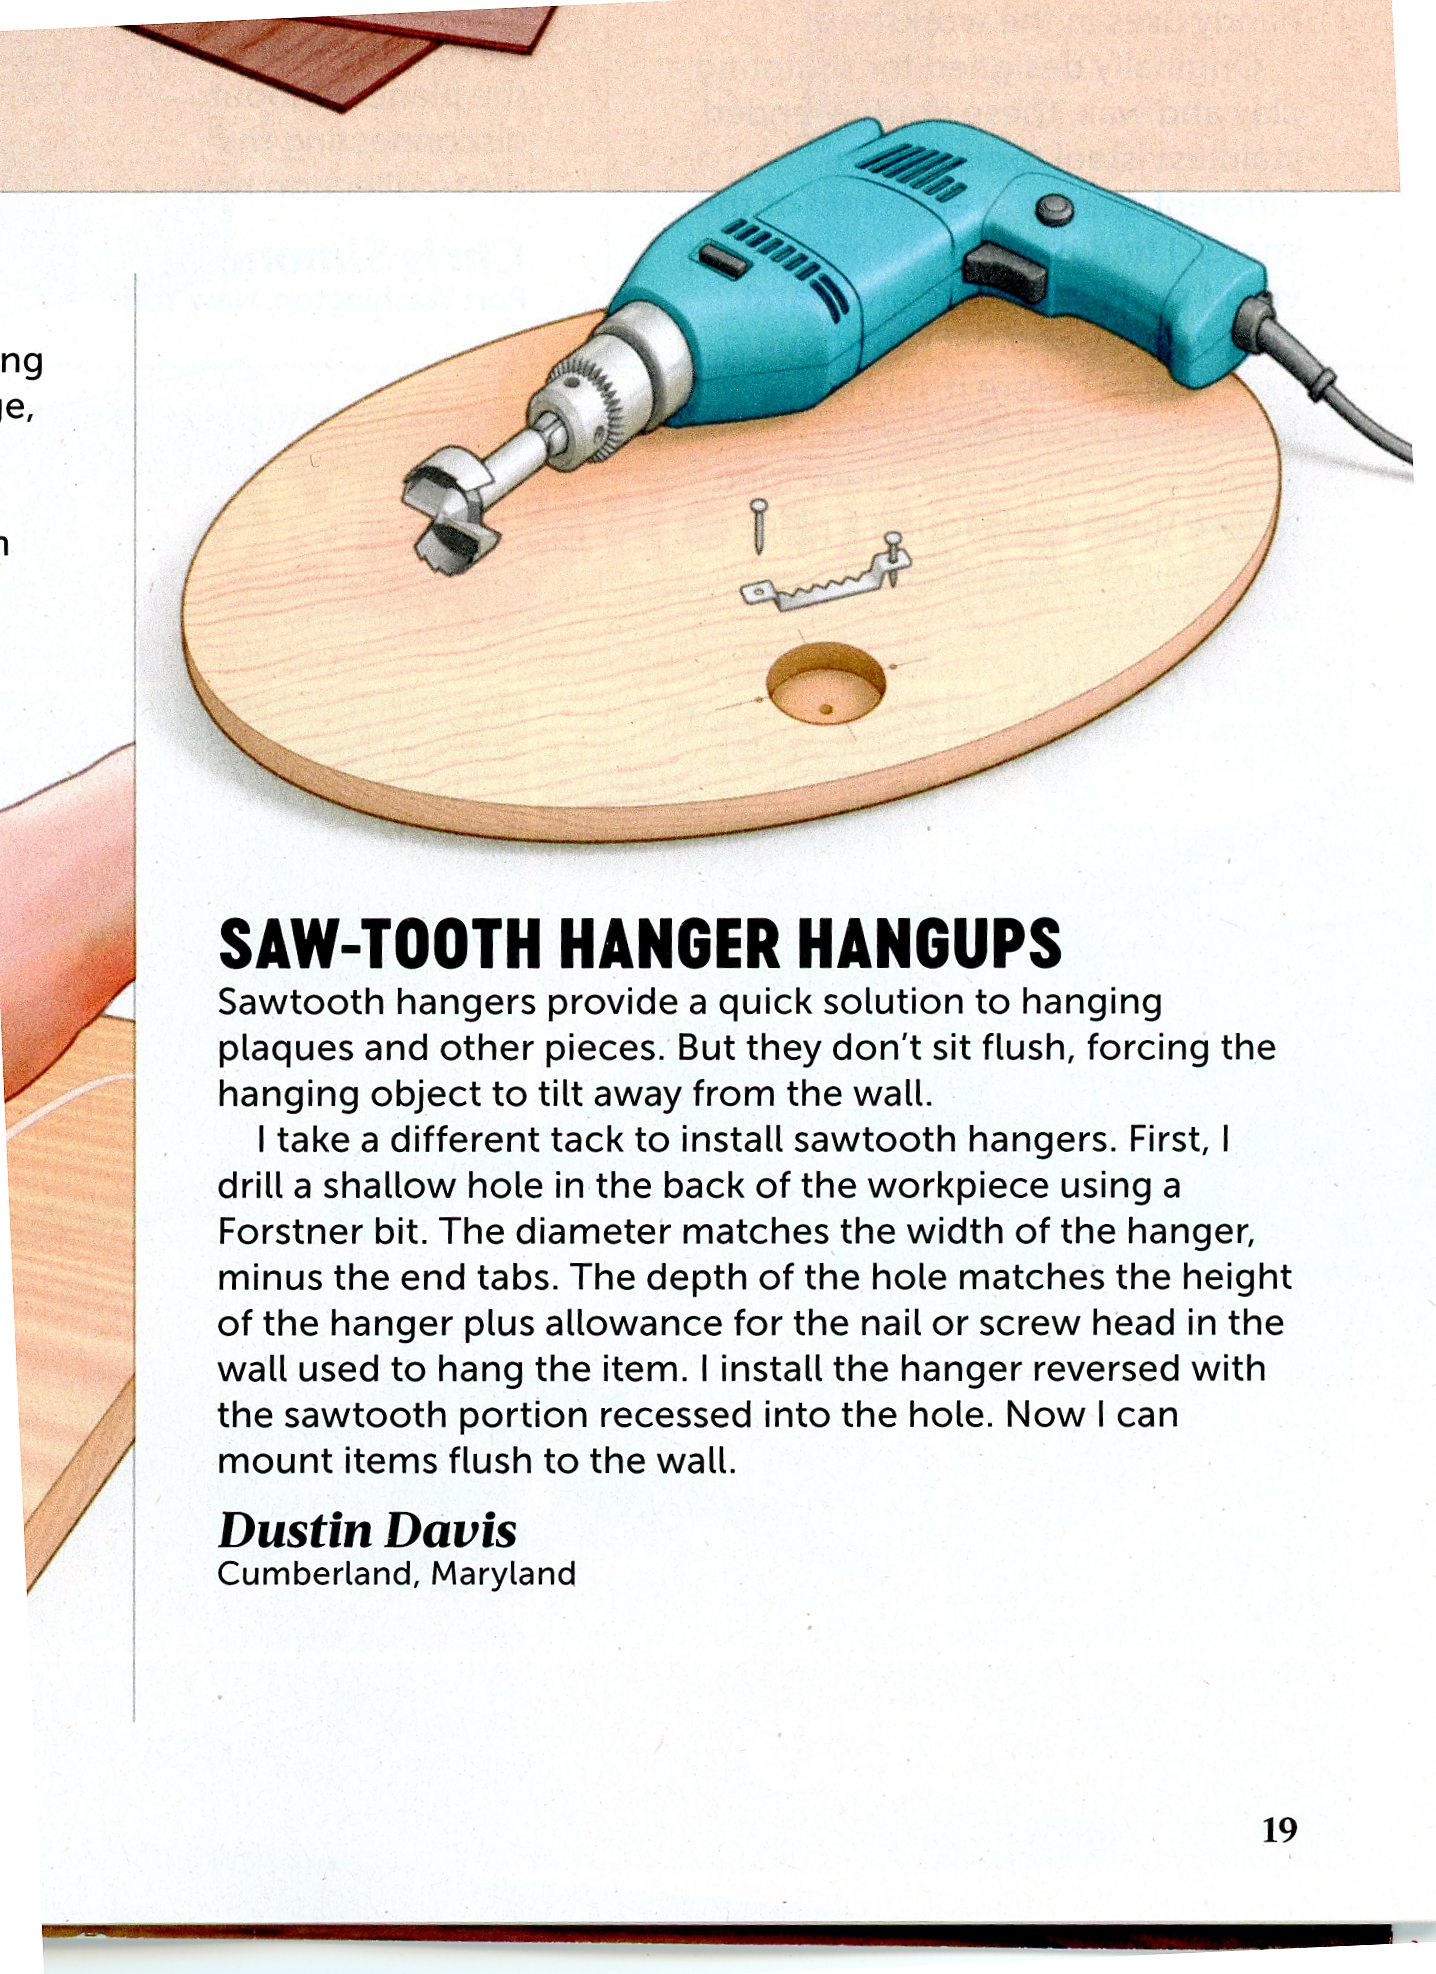
sawtooth hangers wood mag Oct 2023
Highland Woodworking video with Christopher Shwarz at 17:00 "Redneck Planing Jigs"
home made "Wolverine" tool rest for grinder
last updated: Thu 2026-04-30 12:01 PM
![longer user made for reduced splintering [handle instrux]](GRR-Ripper/handle/to make longer gravity heel to prevent splintering.png)
.jpg)
.jpg)
.jpg)
.jpg)
.jpg)
.jpg)
.jpg)